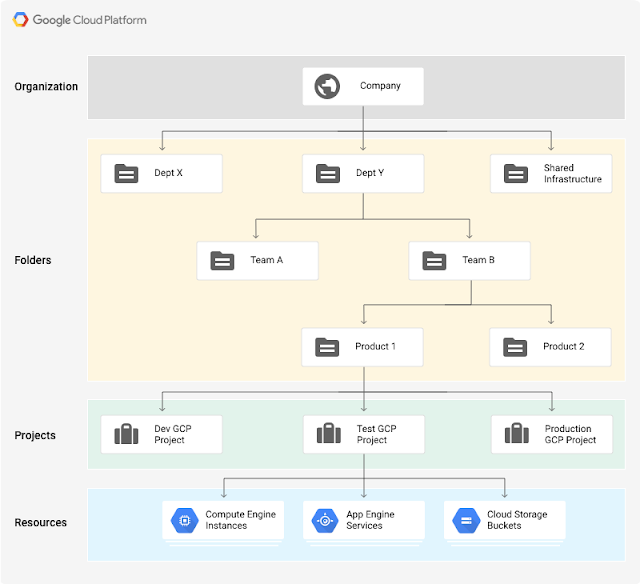
Networks directly connect your resources to each other and to the outside world. Networks, using Firewalls, also house the access policies for incoming and outgoing connections. Networks can be Global (offering horizontal scalability across multiple Regions) or Regional (offering low-latency within a single Region).Subnetworks allow you to group related resources (Compute Engine instances) into RFC1918 private address spaces. Subnetworks can only be Regional. A subnetwork can be in auto mode or custom mode. An auto mode network has one subnet per region, each with a predetermined IP range and gateway. These subnets are created automatically when you create the auto mode network, and each subnet has the same name as the overall network.
A custom mode network has no subnets at creation. In order to create an instance in a custom mode network, you must first create a subnetwork in that region and specify its IP range. A custom mode network can have zero, one, or many subnets per region.
Review the default network
When a new project is created, a default network configuration provides each region with an auto subnet network. You can create up to four additional networks in a project. Additional networks can be auto subnet networks, custom subnet networks, or legacy networks. Each instance created within a subnetwork is assigned an IPv4 address from that subnetwork range. Let’s review your network. Click Products & services > VPC network.
Firewalls
See Subnetworks and firewall rules for more information on how you can use firewall rules to isolate subnetworks. Each network has a default firewall that blocks all inbound traffic to instances. To allow traffic to come into an instance, you must create “allow” rules for the firewall. Additionally, the default firewall allows traffic from instances unless you configure it to block outbound connections using an “egress” firewall configuration. Therefore, by default you can create “allow” rules for traffic you wish to pass ingress, and “deny” rules for traffic you wish to restrict egress. You may also create a default-deny policy for egress and prohibit external connections entirely. In general, it is recommended to configure the least permissive firewall rule that will support the kind of traffic you are trying to pass. For example, if you need to allow traffic to reach some instances, but restrict traffic from reaching others, create rules that allow traffic to the intended instances only. This more restrictive configuration is more predictable than a large firewall rule that allows traffic to all of the instances. If you want to have “deny” rules to override certain “allow” rules, you can set priority levels on each rule and the rule with the lowest numbered priority will be evaluated first. Creating large and complex sets of override rules can lead to allowing or blocking traffic that is not intended. The default network has automatically created firewall rules, which are shown below. No manually created network of any type has automatically created firewall rules. For all networks except the default network, you must create any firewall rules you need. The ingress firewall rules automatically created for the default network are as follows:
default-allow-internal
default-allow-ssh
default-allow-rdp
default-allow-icmp
Creating a custom network
Creating a new network with custom subnet ranges When manually assigning subnetwork ranges, you first create a custom subnet network, then create the subnetworks that you want within a region. You do not have to specify subnetworks for all regions right away, or even at all, but you cannot create instances in regions that have no subnetwork defined. When you create a new subnetwork, its name must be unique in that project for that region, even across networks. The same name can appear twice in a project as long as each one is in a different region. Because this is a subnetwork, there is no network-level IPv4 range or gateway IP, so none will be displayed. You can either create your custom network with the console or with the cloud shell. We’ll show you both, but you have to decide which method to use while taking the lab. For example, you cannot go through a section using the instructions for the console, then go through the same section using gcloud command line.Create Custom Network with the Console
- To create a customer network, click Products & services > Networking > VPC network.
- Click Create VPC Network and name it "taw-custom-network".
- On the Custom tab create:
- Subnet name: subnet-us-central
- Region: us-central1
- IP address range: 10.0.0.0/16
Now click + Add subnetwork and add 2 more subnets in their respective regions: subnet-europe-west, 10.1.0.0/16 subnet-asia-east, 10.2.0.0/16 Click Create to to finish. At this point, the network has routes to the Internet and to any instances that you might create. But, it has no firewall rules allowing access to instances, even from other instances. You must create firewall rules to allow access.
Create custom network with Cloud Shell
Create subnet-europe-west with an IP prefix
gcloud compute networks subnets create subnet-europe-west \
--network taw-custom-network \
--region europe-west1 \
--range 10.1.0.0/16
Created [https://www.googleapis.com/compute/v1/projects/cloud-network-module-101/regions/europe-west1/subnetworks/subnet-europe-west].
NAME REGION NETWORK RANGE
subnet-europe-west europe-west1 taw-custom-network 10.1.0.0/16
List your networks. If you created an auto subnet network in the prior section, those subnets will be listed as well.
gcloud compute networks subnets list \
--network taw-custom-network
(Output) NAME REGION NETWORK RANGE
subnet-europe-west europe-west1 taw-custom-network 10.2.0.0/16
subnet-asia-east asia-east1 taw-custom-network 10.1.0.0/16
subnet-us-central us-central1 taw-custom-network 10.0.0.0/16
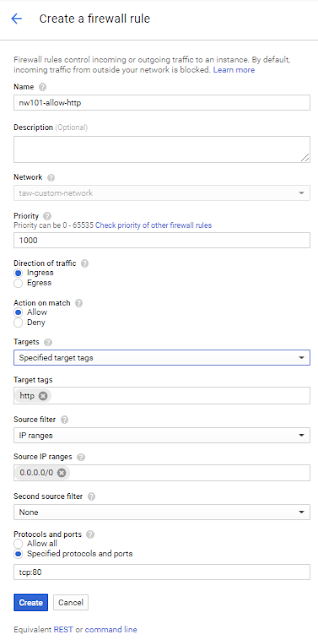
At this point, the network has routes to the Internet and to any instances that you might create. But, it has no firewall rules allowing access to instances, even from other instances. You must create firewall rules to allow access. Adding Firewall Rules To allow access to VM instances, you must apply firewall rules. We will use an instance tag to apply the firewall rule to your VM instances.The firewall rule will apply to any VM using the same instance tag. Note: Instance Tags are used by networks and firewalls to apply certain firewall rules to tagged VM instances. For example, if there are several instances that perform the same task, such as serving a large website, you can tag these instances with a shared word or term and then use that tag to allow HTTP access to those instances with a firewall rule. Tags are also reflected in the metadata server, so you can use them for applications running on your instances. Start by opening the firewall to allow HTTP Internet requests, then you'll add more firewall rules. Firewall rules can be added using the Console or Cloud Shell.
Add firewall rules through the Console
Navigate to VPC networking with the Menu and click on the taw-custom-networking network: Click Add Firewall rule: Enter the values so that screenshould look like this:

Click Create and wait until the command succeeds. Next you'll create the additional firewall rules you'll need.
Create additional firewall rules using Cloud Shell
ICMP
gcloud compute firewall-rules create "nw101-allow-icmp" --allow icmp --network "taw-custom-network"Internal communication
gcloud compute firewall-rules create "nw101-allow-internal" --allow tcp:0-65535,udp:0-65535,icmp --network "taw-custom-network" --source-ranges "10.0.0.0/16","10.2.0.0/16","10.1.0.0/16"ssh
gcloud compute firewall-rules create "nw101-allow-ssh" --allow tcp:22 --network "taw-custom-network" --target-tags "ssh"Review your network in the Console. Note: What about those Routes I see in the Network console? GCP Networking uses Routes to direct packets between subnetworks and to the Internet. Whenever a subnetwork is created (or pre-created) in your Network, routes are automatically created in each region to allow packets to route between subnetworks. These cannot be modified.
Additional Routes can be created to send traffic to an instance, a VPN gateway, or default internet gateway.These Routes can be modified to tailor the desired network architecture. Routes and Firewalls work together to ensure your traffic gets where it needs to go.
Connecting to your VMs and checking latency
Click on the VPC network button in the left menu to see your entire network. The taw-custom-network has three subnetworks and the firewalls rules applied.
Creating a VM in each zone
For this section of the lab, start in Cloud Shell. Run these commands to create an instance in each of the three subnets. Be sure to note the external IPs for later use in this lab.
gcloud compute instances create us-test-01 \
--subnet subnet-us-central \
--zone us-central1-a \
--tags ssh,http
Created [https://www.googleapis.com/compute/v1/projects/cloud-network-module-101/zones/us-central1-a/instances/us-test-01]. NAME ZONE MACHINE_TYPE PREEMPTIBLE INTERNAL_IP EXTERNAL_IP STATUS us-test-01 us-central1-a n1-standard-1 10.0.0.2 104.198.230.22 RUNNING
gcloud compute instances create europe-test-01 \ --subnet subnet-europe-west \ --zone europe-west1-b \ --tags ssh,http
gcloud compute instances create asia-test-01 \ --subnet subnet-asia-east \ --zone asia-east1-a \ --tags ssh,http
Verify you can connect your VM
Now we'll do a few exercises to test the connection to your VMs. Switch back to the Console and navigate to Compute Engine. Click the SSH button corresponding to the us-test-01 instance. This opens an SSH connection to the instance in a new window. In the SSH window of us-test-01, type the following commands to use an ICMP echo against europe-test-01 and asia-test-01, adding the external IP address for each VM in-line:
ping -c 3 <europe-test-01-external-ip-address>
PING 35.187.149.67 (35.187.149.67) 56(84) bytes of data.
64 bytes from 35.187.149.67: icmp_seq=1 ttl=76 time=152 ms
64 bytes from 35.187.149.67: icmp_seq=2 ttl=76 time=152 ms
64 bytes from 35.187.149.67: icmp_seq=3 ttl=76 time=152 ms
Use ping to measure latency
Use ping to measure the latency between instances between all the regions. For example, to observe the latency from the US Central region to the Europe West region, run the following command after opening an SSH window on the us-test-01:
ping -c 3 europe-test-01
64 bytes from europe-test-01.c.cloud-network-module-101.internal (10.2.0.2): icmp_seq=1 ttl=64 time=105 ms
64 bytes from europe-test-01.c.cloud-network-module-101.internal (10.2.0.2): icmp_seq=2 ttl=64 time=104 ms
64 bytes from europe-test-01.c.cloud-network-module-101.internal (10.2.0.2): icmp_seq=3 ttl=64 time=104 ms
Things to think about: What is the latency you see between regions?
What would you expect under ideal conditions? What is special about the connection from europe-test-01 to asia-test-01?
Internal DNS: How is DNS provided for VM instances?
Each instance has a metadata server that also acts as a DNS resolver for that instance. DNS lookups are performed for instance names. The metadata server itself stores all DNS information for the local network and queries Google's public DNS servers for any addresses outside of the local network. An internal fully qualified domain name (FQDN) for an instance looks like
this:hostName.c.[PROJECT_ID].internal
You can always connect from one instance to another using this FQDN. If you want to connect to an instance using, for example, just hostName, you need information from the internal DNS resolver that is provided as part of Compute Engine.


0 Comments